
DIY Customized t-shirt
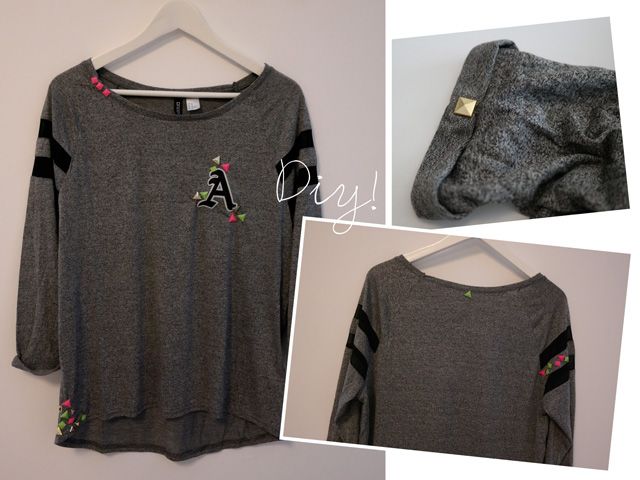
I love customizing my clothes, so when I found these H&M studs and iron-on appliques on sale… I knew I had to buy them!!! After a few days thinking what to do with them, I decided to buy a long sleeve t-shirt and customize it. At first, I wanted to customize a pair of shorts, but fall is here and the lack of summery days would not let me wear them till next year! So I went to H&M and I found this t-shirt with see through details. Here are my steps for this DIY customized t-shirt:
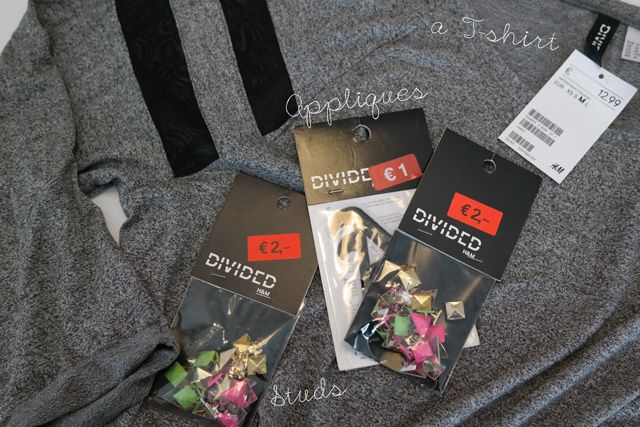
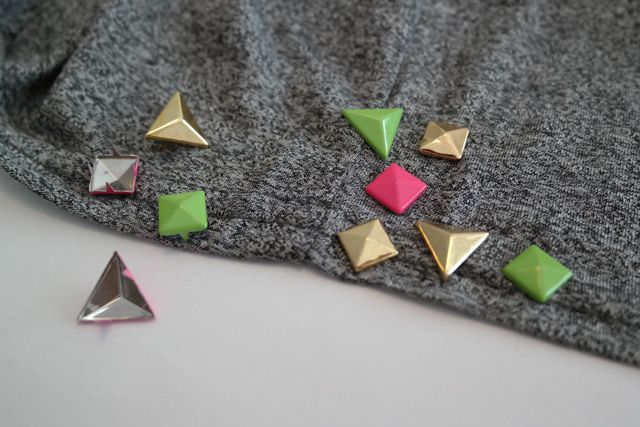
- Get a t.shirt (or any piece of clothing u want to update!), studs and an iron-on applique.
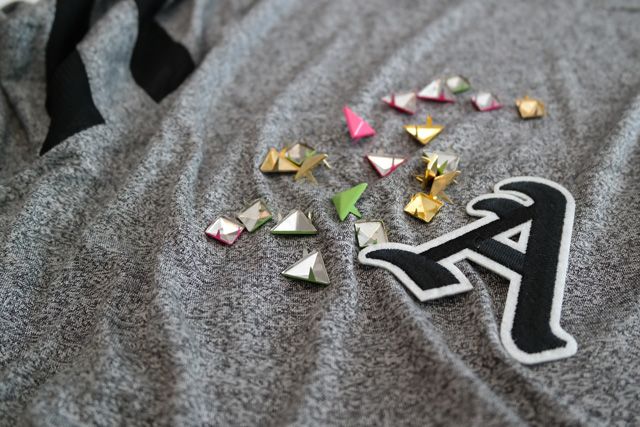
- Arrange the studs and appliques in different ways to make sure you find the one you like the best ![]()
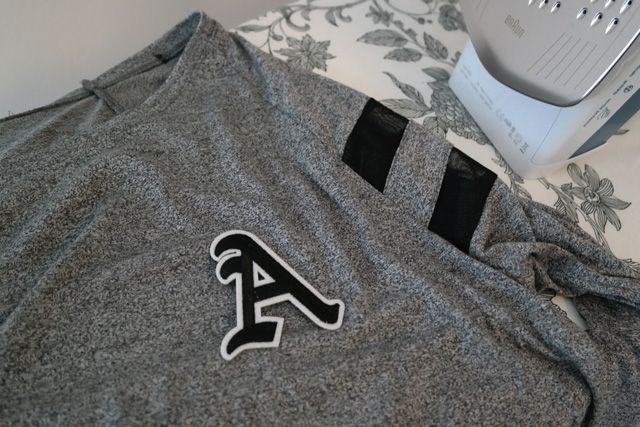
- Iron-on the applique and let it dry! (Use a damp cloth in between the the iron and the applique)
- Start applying the studs to your top! Do not overthink it ![]()

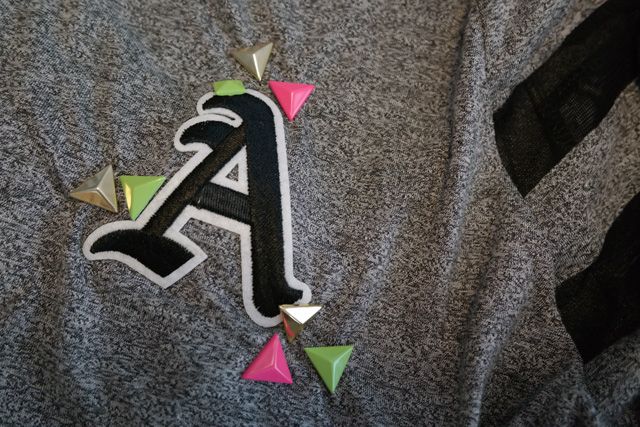
- I decided to add some studs in the arm in between the see through fabrics. At first I was planning on covering both sides but ended up doing just half of one side. Like the fact that you can only see it from the back ![]()
- I used the leftover studs to decorate the bottom of the t-shirt.
And voila! That was it! This super easy DIY takes no time and it’s perfect for personalizing and updating old clothes ![]()

Marianna De Luca
September 22, 2014 at 8:22 am (9 months ago)Love it!
Marianna,
THE ADVENTURES OF A SHOPAHOLIC
THE ADVENTURES OF A SHOPAHOLIC ON FACEBOOK
KizzyDoll
September 22, 2014 at 9:26 am (9 months ago)This came out super doll, love customising things :))) Have a great week xx
xx
Koey
September 22, 2014 at 10:17 am (9 months ago)Oh this is awesome! Will try it soon! Btw I’ve followed you, hope you can follow me back heh
http://www.koeyleow.com,
xox
jackie harrison
September 22, 2014 at 10:23 am (9 months ago)Cool diy you made look so easy.
http://tifi11.blogspot.com
Celeste
September 22, 2014 at 11:11 am (9 months ago)Me encanta como ha quedado!!!
Besos
C
sandra
September 22, 2014 at 11:39 am (9 months ago)wow;-) very good diy, like it;-)
Lilli
September 22, 2014 at 11:39 am (9 months ago)I really like the resuld, you have been so good Ileana! xo
Cissy
September 22, 2014 at 1:14 pm (9 months ago)Very cute idea! I love it! You have all the best posts
xx Cissy
http://www.idreamofbunnies.com
Follow on Facebook
Anett
September 22, 2014 at 1:15 pm (9 months ago)Love it, so pretty and creative!
Bella Pummarola
Style&Paper
September 22, 2014 at 1:34 pm (9 months ago)Que chula te quedó!!! Me encanta!
Besos
Style and Paper
Bloglovin
pilar domínguez
September 22, 2014 at 1:46 pm (9 months ago)Nunca he visto este tipo de apliques en H&M, qué chulos son!! como los vea por aquí me los compro para customizar mi ropa. Me encanta cómo son y cómo te ha quedado la camiseta. Bss:)
mary
September 22, 2014 at 2:40 pm (9 months ago)great job
http://befashion31.blogspot.it/
https://www.facebook.com/Befashion31
Rebecca
September 22, 2014 at 4:03 pm (9 months ago)What a lovely DIY! I love the idea of wearing something that no one else will be wearing! The colored studs are really awesome!
Rebecca
http://www.winnipegstyle.ca
Amy Fashion Blog
September 22, 2014 at 5:28 pm (9 months ago)what a fun DIY project.
i.s.
September 22, 2014 at 5:30 pm (9 months ago)so cute x
http://www.vicariousLA.com
glamourzone
September 22, 2014 at 7:20 pm (9 months ago)that is so cool,it looks awesome
keep intouch
xoxo
Laura C.
September 22, 2014 at 11:27 pm (9 months ago)Such a cool idea!
Laura. xx
http://www.stylishvue.blogspot.com
Gemma Donohue
September 23, 2014 at 3:26 am (9 months ago)This come out
Absolutely beautiful
Such a great idea
xoxo
http://stunningchic.com/
Coco
September 23, 2014 at 4:21 am (9 months ago)Great job Ileana!! It looks very nice with the touch of colour of the studs!
Baci,
Coco
Coco et La vie en rose / Bloglovin / Facebook
Rena
September 23, 2014 at 5:03 am (9 months ago)I like this cool idea!
xx from Bavaria/Germany, Rena
International giveaway: Top form by the reasons of problems
http://www.dressedwithsoul.com
mihaela pojogu
September 23, 2014 at 8:49 am (9 months ago)Pretty result, those studs looks like candies. xoxo
Con R de Reymara
September 23, 2014 at 10:28 am (9 months ago)Es una ideal, me encanto este DIY. Besos guapa!
conrdereymara.blogspot.com
Kyle Rodriguez
September 23, 2014 at 10:55 am (9 months ago)I love those colorful studs. You did a great job! <3
http://www.thestylishbipolar.com
Ashley
September 23, 2014 at 2:30 pm (9 months ago)Such a super fun DIY!
-Ashley
http://lestylorouge.com
gogui
September 23, 2014 at 2:41 pm (9 months ago)love this creative diy! I just stumbled upon your blog! And wow it is amazing, definitely one which is great for inspiration. I love this post specially the great vivid pictures! I would love for you to check out my blog, which by just scrolling through your page, I know you will love!! Keep up the good work
http://www.timeless-look.com
Desle
September 23, 2014 at 3:37 pm (9 months ago)This DIY tutorial is perfect! It came out great and looks so pretty. Thanks for the great tips! ;-)))
Lady parisienne
September 23, 2014 at 6:00 pm (9 months ago)oh the result is very pretty!!!
Harriet Jones
September 23, 2014 at 7:20 pm (9 months ago)This is so cute! Great job! Love the single stud to keep the sleeves rolled up
Harriet
http://greeneyesandlongblondehair.blogspot.Co.uk
Caro*
September 23, 2014 at 7:53 pm (9 months ago)Beautiful idea ! I love it
Tosyne
September 23, 2014 at 8:45 pm (9 months ago)Impressive! I will try it soon
http://www.tosyne101.wordpress.com
http://anna-and-klaudia.blogspot.com/
September 23, 2014 at 9:08 pm (9 months ago)Wow!! fantastic DIY great job
Melolimparfaite blog mode
September 23, 2014 at 11:29 pm (9 months ago)cool idea ! I should try diy more often
Jasmine
September 24, 2014 at 7:38 am (9 months ago)Great DIY tip! You have created a gorgeous piece from that t-shirt. Love it!
Jasmine xx
For a Real Woman – Instagram – Bloglovin